 Environmental graphics, often called experiential or wayfinding graphics, play a crucial role in shaping the identity and atmosphere of a space. They provide functional information and enhance the aesthetic appeal and emotional connection within a space. Whether it’s a corporate office, retail environment, or public space, well-designed environmental graphics can significantly impact how people interact with their surroundings. Here’s a step-by-step guide to help you understand how to create effective environmental graphics. *
Understanding the Project Goals
- Client Briefing: The process begins with a thorough understanding of the client’s vision, brand identity, and specific goals for the space. What message do they want to convey? How should visitors feel when they enter the space?
- Space Analysis: Assess the physical environment to understand the flow of traffic, architectural features, and anypotential challenges. This analysis will inform design decisions and ensure the graphics complement the space rather than overwhelm it.
- Site Survey: Conduct a detailed site survey to plan the installation process.
Research and Concept Development
- Brand Integration: The graphics must align with the client’s brand identity. Research into the brand’s values, color schemes, typography, and overall aesthetic is essential.
- Audience Consideration: Understanding the target audience is key. Who will be interacting with these graphics? What are their needs and expectations? You should taylor to resonate with the intended users.
- Concept Ideation: Based on the research, develop initial concepts encapsulating the project’s objectives. These concepts should explore various styles, themes, and materials that somebody could use to create the desired impact.
Design Development
- Sketching and Drafting: Start with rough sketches to explore different layout options. This phase allows for experimentation with placement, scale, and composition.

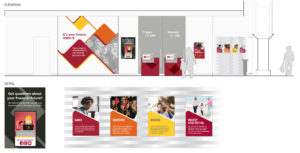
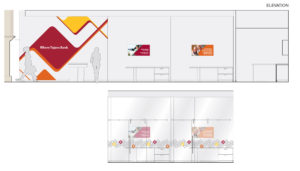
- Digital Rendering: Create detailed elevation renderings once the basic design direction is approved. These should include mockups of how the graphics will look in the actual space, incorporating textures, colors, and lighting effects.
- Client Feedback: Present the designs to the client for feedback. This collaborative step ensures the design meets expectations and aligns with the brand.
Material Selection and Prototyping
- Material Research: Choose materials that are visually appealing, durable, and suitable for the environment. For example, consider how different materials will hold up in various lighting conditions, weather (if outdoors), and over time.
- Prototyping: Create prototypes or sample prints to test the materials and colors in the actual space. This step helps fine-tune the design and ensures the final product will look as intended.
Production and Fabrication
- Vendor Collaboration: Work closely with fabricators and print vendors to ensure the design is produced to the highest quality. This includes overseeing signage production, wall graphics, and any other elements involved.
- Quality Control: Monitor the production process for consistency and accuracy in colors, finishes, and materials. It’s crucial to catch any discrepancies early to avoid costly errors.
Installation Planning
- Logistics: Consider the logistics of getting materials into the space, any necessary equipment, and the best time to install to minimize disruption.

- Installation Coordination: Coordinate with contractors, electricians, and other stakeholders to ensure the graphics are installed safely and correctly. This may involve overseeing the installation process to ensure everything is positioned accurately according to the design.
Final Installation
- Precision Installation: Install the graphics precisely, ensuring they are level, aligned, and securely attached. This step often requires professional installers, especially for large-scale graphics.
- Post-Installation Review: Once the installation is complete, review the space to ensure everything is as planned. Make any necessary adjustments and conduct a final walkthrough with the client for approval.
Ongoing Maintenance and Evaluation
- Maintenance Plan: Provide the client with a plan to keep the graphics fresh and in good condition. This might include cleaning instructions or recommendations for dealing with wear and tear.
- Evaluation: Periodically evaluate the effectiveness of the graphics. Are they still meeting the intended goals? Is the audience responding positively? Use this feedback to make any future adjustments or improvements.
Creating environmental graphics is a complex, multi-step process that requires a balance of creativity, technical skill, and practical planning. By following these steps, you can create graphics that enhance a space’s aesthetic appeal and contribute to a cohesive and engaging user experience. If you need assistance or have questions about an upcoming environmental graphic design project, feel free to reach out.
If you like what you read, we’d love to hear your comments or input on LinkedIn here.
*project shown is for a credit union reflects Amy’s work with Adrenaline and Reilly Design.


